Compacting Firefox's Layout with Sidebery and User Chrome
Modern applications commonly rely on vertically-stacked horizontal navigation. That's despite the fact that most desktop users use widescreen displays where horizontally-stacked vertical navigation would be more economical. Web browsers suffer from this especially. Web pages typically opt to centre themselves horizontally with a ton of empty space on both sides, while struggling to fit content vertically.
The tab bar is one of those horizontal elements taking up that precious vertical real-estate. Not to mention, it's poorly suited for our web browsing habits. It only takes an hour or so until it becomes a claustrophobic mess of overlapping icons and ellipsis.
To solve this, there are a number of tab management extensions: sidebar tabs, tab pages, tab grouping, and so on. I like Sidebery a lot as it has a ton of customisation options compared to the more popular Tree Style Tab. However, since the tab bar is often baked into the browser's layout, often as part of the title bar, these extensions aren't able to remove it. It was possible back in Firefox's XUL add-on days, but those days are long gone, everything's Web Extensions now.
Luckily, Firefox still supports user chrome styling. They'll likely remove it completely at some point, but it's still available for now. So, after come CSS hacks, here's how my Firefox looks.
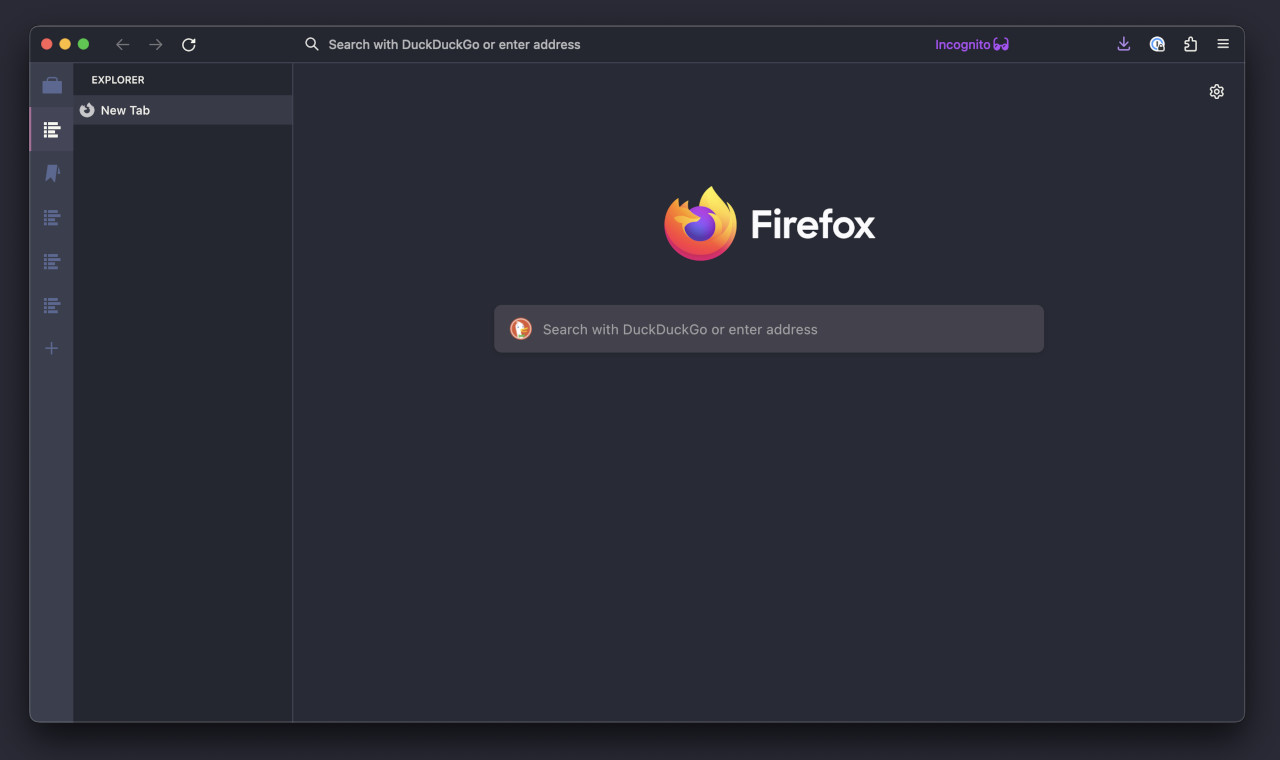
To get this layout, there are two things we need to style: Firefox and Sidebery.
Styling Firefox's chrome
First, we'll need to re-enable user chrome styling. Before we begin, remember that customising user chrome has certain risks if you don't know what you're doing. As the about:config page says, do this at your own risk.
- In Firefox, go to
about:config - Set
toolkit.legacyUserProfileCustomizations.stylesheetstotrue.
Now we can apply some custom styling. These styles are for Firefox on macOS, so you may need to customise it for your operating system.
- In Firefox, go to
about:profiles - Under the current profile in use, next to "Root Directory", click "Open Folder" (or "Open Finder" on macOS).
- In the opened directory, create a new file under
<profile directory>/chrome/userChrome.css. - Edit the file and add the following:
#main-window[titlepreface*="[Sidebery]"] #navigator-toolbox {
  --toolbar-bgcolor: #242631;
  display: flex !important;
  background-color: var(--toolbar-bgcolor) !important;
}

#main-window[titlepreface*="[Sidebery]"] #TabsToolbar .titlebar-spacer,
#main-window[titlepreface*="[Sidebery]"] #TabsToolbar .toolbar-items {
  display: none !important;
}

#main-window[titlepreface*="[Sidebery]"] #TabsToolbar .titlebar-buttonbox {
  margin-right: 12px !important;
}

#main-window[titlepreface*="[Sidebery]"] #nav-bar {
  flex-grow: 1 !important;
}

#sidebar-header {
  display: none;
}

#sidebar-splitter {
  --sidebar-border-color: var(--chrome-content-separator-color);
}

#navigator-toolbox {
  --toolbarbutton-hover-background: hsla(0, 0%, 70%, 0.2);
}

#urlbar-background {
  --toolbar-field-border-color: transparent;
  --toolbar-field-background-color: transparent;
  --toolbar-field-focus-border-color: #a86595;
  --toolbar-field-focus-background-color: #242631;
  --arrowpanel-border-color: #a86595;
}
Here we're using #main-window[titlepreface*="[Sidebery]"] to detect when Sidebery is enabled to hide the tab bar and make room for window buttons in the URL bar. With this approach, when disable Sidebery is disabled, the tab bar will re-appear.
Note that if Firefox updates and changes any of its chrome layout, this stylesheet may need to be updated to fix any layout issues.
Styling Sidebery's theme
Sidebery's styling is a bit complicated as it has a combination of a UI for setting styles for known variables and the ability to add custom CSS. To avoid going through each variable individually, I've exported my current styles which can be imported as follows.
- Place the following content in a new file called
sideber-styles.json.
{"cssVars":{"bg":"#242631ff","title_fg":null,"sub_title_fg":null,"label_fg":null,"label_fg_hover":null,"label_fg_active":null,"info_fg":null,"true_fg":null,"false_fg":null,"active_fg":null,"inactive_fg":null,"favicons_placeholder_bg":"#c8c8cbff","btn_bg":null,"btn_bg_hover":null,"btn_bg_active":null,"btn_fg":null,"btn_fg_hover":null,"btn_fg_active":null,"scroll_progress_h":null,"scroll_progress_bg":null,"ctx_menu_font":null,"ctx_menu_bg":null,"ctx_menu_bg_hover":null,"ctx_menu_fg":null,"nav_btn_fg":null,"nav_btn_width":"48px","nav_btn_height":"48px","pinned_dock_overlay_bg":null,"pinned_dock_overlay_shadow":null,"tabs_height":"32px","tabs_pinned_height":null,"tabs_pinned_width":null,"tabs_indent":"16px","tabs_font":"inherit","tabs_count_font":null,"tabs_fg":"#6272a4","tabs_fg_hover":"#f8f8f2","tabs_fg_active":null,"tabs_bg_hover":"#373a49","tabs_bg_active":null,"tabs_activated_bg":"#373a49","tabs_activated_fg":"#f8f8f2","tabs_selected_bg":"#373a49","tabs_selected_fg":"#f8f8f2","tabs_border":null,"tabs_activated_border":null,"tabs_selected_border":null,"tabs_shadow":null,"tabs_activated_shadow":null,"tabs_selected_shadow":null,"tabs_lvl_indicator_bg":null,"bookmarks_bookmark_height":"32px","bookmarks_folder_height":"32px","bookmarks_separator_height":null,"bookmarks_bookmark_font":"inherit","bookmarks_folder_font":"inherit","bookmarks_node_title_fg":"#f8f8f2","bookmarks_node_title_fg_hover":"#f8f8f2","bookmarks_node_title_fg_active":"#f8f8f2","bookmarks_node_bg_hover":"#373a49","bookmarks_node_bg_active":"#373a49","bookmarks_folder_closed_fg":"#f8f8f2","bookmarks_folder_closed_fg_hover":"#f8f8f2","bookmarks_folder_closed_fg_active":"#f8f8f2","bookmarks_folder_open_fg":"#f8f8f2","bookmarks_folder_open_fg_hover":"#f8f8f2","bookmarks_folder_open_fg_active":"#f8f8f2","bookmarks_folder_empty_fg":"#6272a4","bookmarks_open_bookmark_fg":"#f8f8f2"},"sidebarCSS":"\n.TabsPanel.panel,\n.Bookmarks.panel {\n padding-top: 35px;\n}\n\n.TabsPanel.panel::before,\n.Bookmarks.panel::before {\n content: 'Explorer';\n display: block;\n height: 35px;\n line-height: 35px;\n position: absolute;\n top: 0;\n left: 0;\n right: 0;\n text-transform: uppercase;\n color: var(--tabs-activated-fg);\n padding: 0 20px;\n font-size: 11px;\n font-weight: 500;\n}\n\n.Bookmarks.panel::before {\n content: 'Bookmarks';\n}\n\n.Bookmarks {\n font-weight: 500;\n}\n\n/*\n.Tab {\n border-right: 2px solid transparent;\n}\n.Tab[data-active=\"true\"] {\n border-right: 2px solid #a86595;\n}\n*/\n\n.Tab .ctx {\n display: none;\n}\n\n.Tab .title {\n font-size: 13px;\n font-weight: 500 !important;\n}\n\n.Tab .close > svg {\n fill: var(--tabs-activated-fg);\n}\n\n.Tab .close:hover > svg {\n fill: var(--tabs-activated-fg);\n background-color: rgba(255,255,255,0.1);\n border-radius: 2px;\n}\n\n.Tab[data-discarded=\"true\"] {\n color: var(--tabs-fg) !important;\n font-style: italic;\n}\n\n.Tab[data-discarded=\"true\"] .t-box {\n opacity: 1 !important;\n}\n\n.panel-btn {\n border-left: 0 solid transparent;\n border-width: 0 2px;\n}\n\n.panel-btn > svg {\n --container-fg: #6272a4;\n --nav-btn-fg: #6272a4;\n width: 24px !important;\n height: 24px !important;\n}\n\n/*\n.panel-btn:hover {\n background-color: var(--tabs-bg-hover) !important;\n}\n*/\n\n.panel-btn:hover > svg {\n --container-fg: var(--tabs-fg-hover);\n --nav-btn-fg: var(--tabs-fg-hover);\n}\n\n.panel-btn[data-active=\"true\"] {\n background-color: #43465a !important;\n border-left-color: #a86595;\n}\n\n.panel-btn[data-active=\"true\"] > svg {\n --container-fg: var(--tabs-activated-fg);\n --nav-btn-fg: var(--tabs-activated-fg);\n}\n\n.NavigationBar {\n background-color: #3a3f4e;\n box-shadow: none !important;\n}\n\n.TabsPanel .container, .PinnedDock {\n box-shadow: none !important;\n}\n","groupCSS":"","ver":"4.10.2"}- In Firefox, go to Sidebery's settings page.
- Under the "Help" section, click "Import" and select
sidebar-styles.json.
Restart Firefox
Firefox won't pick up the user chrome until it's restarted.
- In Firefox, go to
about:profilesagain. - Under "Restart", click "Restart normally..."
Tweak the URL bar's layout
Depending on how your URL bar was previously customised, you may need to further customise it to look appropriate for this layout.
- In Firefox, open the menu (three lines on your top-right).
- More tools > Customise toolbar...
Make sure you leave some empty spacers so that you can use it to drag the window around as usual.
Conclusion
And that's everything. The colours and specifics may not be to everyone's liking, but it's a good basis for further customisation.
Thanks for reading.